Happy New Year to all of you!!!!
Have fun this New Years Eve and stay safe!!!!
I'll see you all next year!!! :)
Nadya
Thursday, December 31, 2009
Thursday, December 24, 2009
Merry Christmas!!!!
Merry Christmas to you all!!!
I know it's Christmas Eve today but still... :) I hope that you all are enjoying your time with family today and tomorrow!!! What a wonderful time to celebrate the birth of our Savior!!!!!
We'll be opening out gifts tomorrow morning and the girls can not wait to open them up. We got them all wrapped last night and got them under the tree.
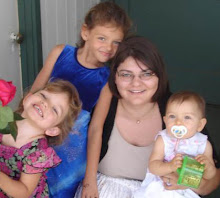
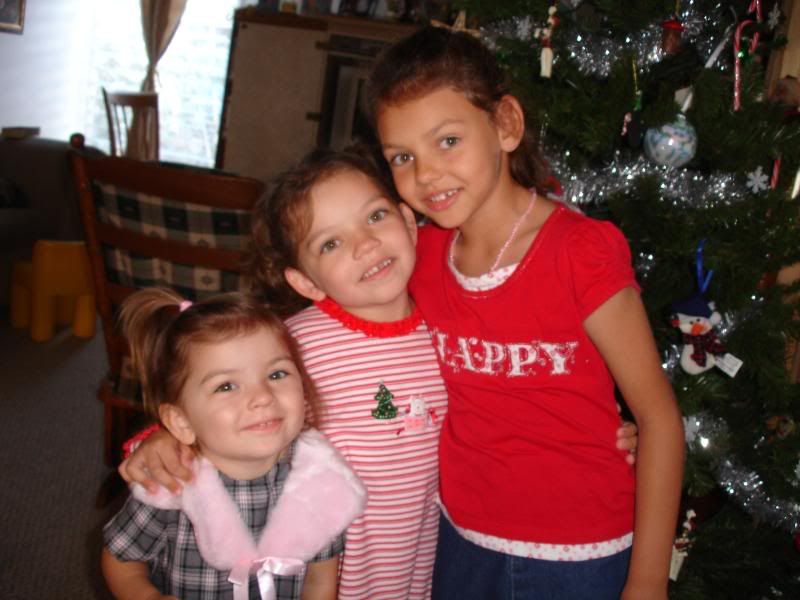
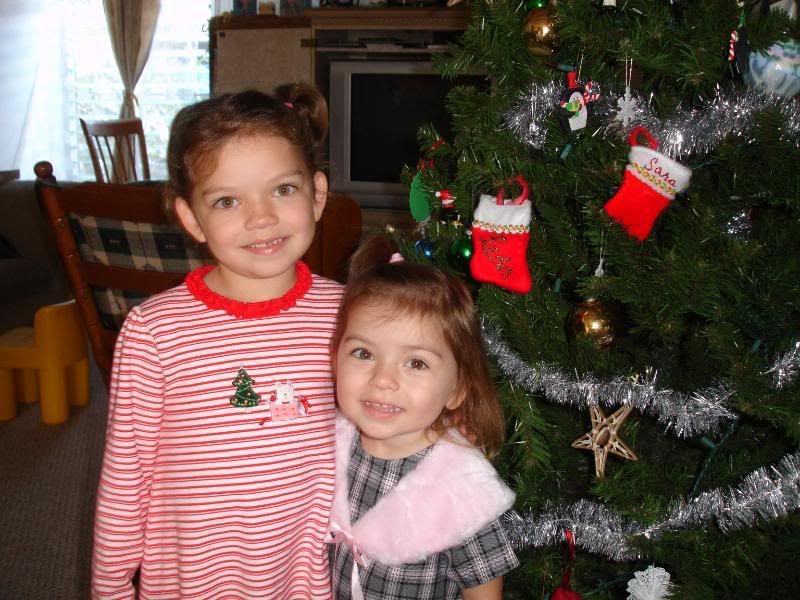
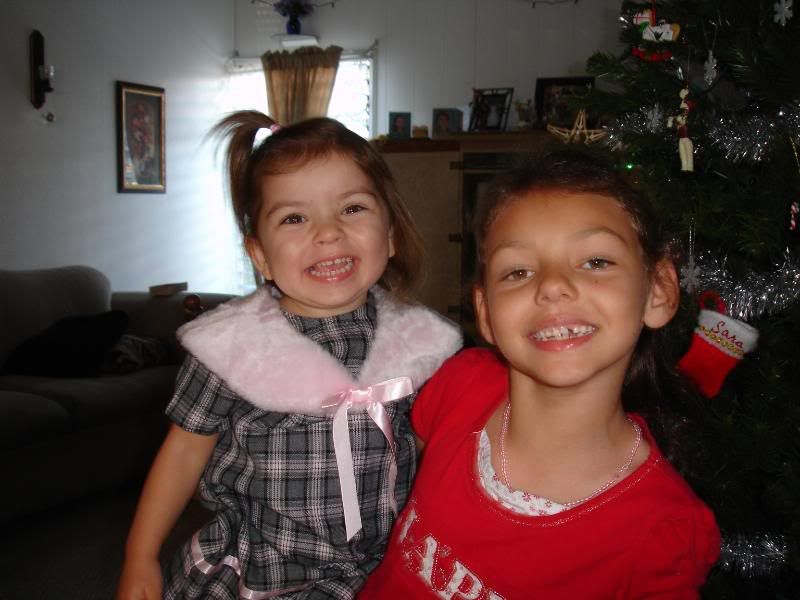
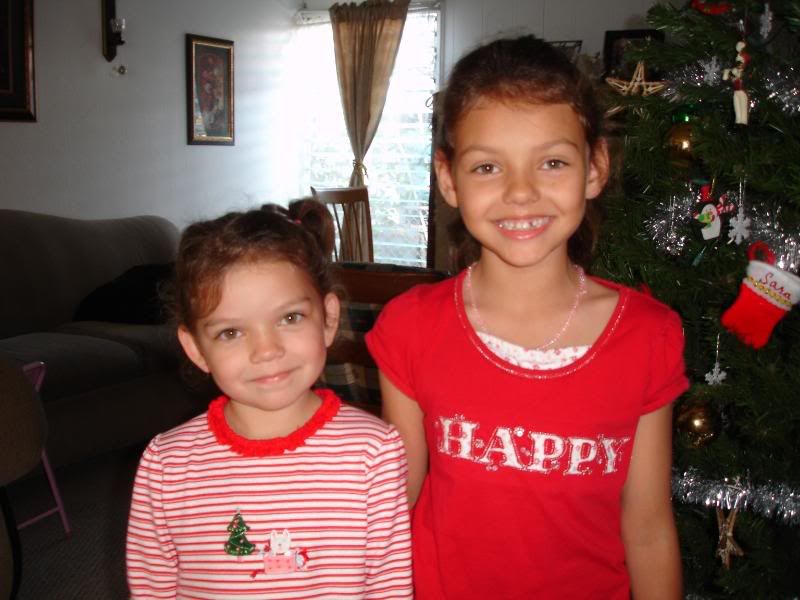
Our families and friends have been asking for new photos of the girls so I thought I'd post some pictures that I took of them from last Sunday as we were getting ready to go to Church.
Katherine, Leda and Sara... :)
Merry Christmas to you all!!!!!!
Nadya :)
I know it's Christmas Eve today but still... :) I hope that you all are enjoying your time with family today and tomorrow!!! What a wonderful time to celebrate the birth of our Savior!!!!!
We'll be opening out gifts tomorrow morning and the girls can not wait to open them up. We got them all wrapped last night and got them under the tree.
Our families and friends have been asking for new photos of the girls so I thought I'd post some pictures that I took of them from last Sunday as we were getting ready to go to Church.
Katherine, Leda and Sara... :)
Merry Christmas to you all!!!!!!
Nadya :)
Sunday, December 13, 2009
Paper Christmas Trees.....
I love making these paper Christmas tress. They are so much fun and so easy to make.
I was shown how to make them couple of years ago by couple of friends from one of the message boards.
All you need is a couple of Styrofoam Cones, I guess as many of them as you want but you'll need online one cone per tree. :)
Then pick your colors and style of Christmas cardstock. All of my trees were different. That makes it more fun I think. :)
Cut your printed paper 1" wide and 3" long. You can arrange the loops of paper on your tree how ever you like it.
When you make a loop make sure that you don't crease it.
You can use those needles with the top hat kind of thing to hold your loops of paper on the cone. I used hut glue gun this time around. I found that the needles don't really hold the paper in place very well, but with hut glue gun those papers don't move at all.
Once you have all of your loops on the cone you can add some thing to the top. It came be a ribbon bow, some flowers or what ever else you have on hand.
I added some jewels and stickles to the papers after I was done with everything, just to make the trees sparkle little more...
I made three trees for our auction this passed week.
The first picture is of the trees that I did about two years ago. Last pictures are of the two trees that I made for the auction, I totally forgot to take a picture of the third tree..... So, sorry your not going to see the third tree.


Thanks for looking and I hope you'll try these out. They are really easy to make and so much fun. You can even have your kids help you.
And don't forget to check out Practical Scrappers for more Christmas ideas....
Merry Christmas,
Nadya :)
Wednesday, December 9, 2009
First day of Auction.....
I'm so tired right now....
Went to bed last night just pass midnight and got up at 6am this morning to be at the School by 7:30am for the auction.
I need to remember to take a picture of our tables when I go back in couple of hours and post it for your all to see.
We already sold some things there. WOOHOO!!! Very exciting!!!! Parents were looking at our stuff right and left... hee hee :) So much excitement!!!!
I can so see the Lords work in this!!!!!!
So anyways thought I'd give a small update for you all!!!! I'll be back soon with some pictures hopefully!!!
Nadya
Tuesday, December 8, 2009
Christmas altered gifts and wrapping...
This week at Practical Scrappers we were asked to do some kind of Christmas wrapping or a gift that we have done.
As you all know I've been doing things for our Auction. One of the things that I'm entering is a Gift wrapping basket. I altered a tin that you saw couple of weeks ago. I made over 40 gift tags. A friend of mine came over to help with a lot of things, so I had her stamp Christmas images on the tissue paper. I also got some cheapboard boxes at our local craft store and altered them, added some ribbon and some Christmas embellishments on top. So that was my entry for Practical Scrappers this week.
And here are my gift boxes with the Christmas tissue paper.


Thanks for stopping by today!!! Stay tuned for more fun Christmas ideas!!! :)
Merry Christmas!
Nadya
Christmas Cards....
Don't you just LOVE Christmas? I do... :) It's been some what cool around here weather wise and it's been so nice. I even pulled out a blanked while I was on the couch watching my husband play his game, it was that chilly... I know many of you are going to say it's not cold in Hawaii... LOL :) But trust me when you get used to the weather you will know the difference between summer weather and winter. And I'm enjoying my cool breezy afternoons!!!! :)
Today is another fun day at Practical Scrappers and they are featuring some of my cards. If you haven't been to their blog yet go check them out. They have a lot of great Christmas ideas.
These cards are very simple, nothing fancy. All of these cards will be going in too our Church Auction that is starting tomorrow. The Auction is a fundraiser for our Church Building Fund. Can't wait till we go tonight to set things up.
Some of the supplies that I used are:
Christmas colors cardstock.
Red, crystal stickles.
For the scalloped square shape on the cards I used Accent Essentials cricut cartridge.
Black pen for pen stitching.
Creative Memories Galaxy mini maker.
Creative Memories star maker.
Buttons.
Ribbon.
For this card I used "Merry Christmas" stamp set by BoBunny.

On this card the I used staz-on ink and the snowflakes are from Christmas stamp set by Martha Steward.

The wreath is the same as you saw couple of weeks ago. Used CM galaxy maker and star maker. "Mele Kalikimaka" is Hawaiian way to say Merry Christmas... :) and that stamp came from CTMH "Tropical Christmas" stamp set, same with the above card.

For this cards I used BoBunny "Merry Christmas" stamp set for the tree and sentiment.

On this card I used Christmas stamps by Martha Steward and "Merry Christmas" stamp set by BoBunny.

Thanks for stopping by my blog today! I hope you liked my Christmas cards. Don't forget to check out Practical Scrappers for more great Christmas ideas. I'll be posting more fun projects this week. :)
Merry Christmas!
Nadya :)
Thursday, December 3, 2009
Advent Calendar...
Today one of my projects is being featured at Practical Scrappers... WOOHOOO!!!! :)
When I first saw this advent calendar I fell in love with it... hee hee No really! I had to make this the same day as I saw it.
Christmas with the Cricut had Christina from Creations with Christina as a guest designer one week and one of the things that Christina made for Christmas with the Cricut was this awesome Advent calendar. It was so easy to make.
You can watch Christina's videos on how she did it here and here at her blog...
Here is my take on this advent calendar.

I had saved bunch of those card board idea sheets that Creative Memories puts with their paper packs. I knew there was a reason why I saved them... :)

I cut the shape using Accent Essentials Cricut cartridge. Had my cricut set to multi cut 3 times (depends on how old your blade is and if you have a deep cut blade) blade set to 6 and pressure to max, size 4 inches. I cut 14 of these cards. Pick your paper pattern and cut the same shape, same size but 24 of them.
I then used glue and glued the patterned paper to the card board shapes. On this photo you can see how much glue I put. The blurry part is the glue.

I used Fabric glue, I used this glue only because it dries fast. You'll need 2 rings and something to punch wholes with. I used my Making Memories Eyelet setter the biggest size.
Advent calendar standing. The calendar is very sturdy so it stands on it's own.

Here are some pictures of couple of the pages.


When you get to # 12 you'll flip the pages over just like the original Advent calendar that was done by Christina that is why that 24 is upside down. Don't forget to go to her blog and check it out.

I used Creative Memories Open House gift set from two years ago, Christmas stickers.
Some of the other shapes I cut out from a patterned paper that I had used and had scraps left over.
Creative Memories Christmas die cuts and Paper Dolls Dress Up Cricut cartridge for other shapes. The numbers are Lyrical Letters cartridge and other stickers.
Lots of stickels. White gel pen on some of the die cuts.
I had a lot of fun doing this project. This is going in to our Auction next week Wednesday. :)
Thanks for visiting my blog today and don't forget to check out Practical Scrappers for more awesome Christmas ideas!!!!
Nadya :)
I've been busy.....
It's Thursday December 3rd, last month of 2009. WOW! How did we get here so fast?
Christmas is almost here, I can't wait!!! :) Wish our family could come and join us for Christmas, but I know we are in their hearts and they are in our hearts during this Holiday season.
So, now to the reason why I've been MIA for couple of weeks. I've been working a lot on our Church Building Fundraiser Craft Silent Auction/Bake Sale. And it's happening next week!!! WOW! All that anticipation and excitement is about to come to an end. I can't wait till Tuesday next week when we'll go in and set the tables and our items and get everything ready for Wednesday morning. Our auction is 3 day long and it is held at our Elementary School. We have so many wonderful things, so many different Christmas gift ideas that so many ladies have come up with. I will be sharing them with you all when I get more time to actually do that. I can feel the Lords hand working in this auction so much. He has already blessed it abundantly and I can't wait to see what else He will do. :) I'm so excited!!!!
So that's what I've been up too. That and working on projects for Practical Scrappers. Don't forget they are featuring a lot of Christmas projects right now. This week is Cards and I can't tell you what next week is you'll just have to go to PS and check it out and don't forget to play along.
I haven't shared with you my layout for PS from couple of weeks ago so here it is. We had to use acrylic paint. So I painted my cheapboard stars with English Lace and Yellow acrylic paint. I also used the negative peace that was left after I punched the stars out as my stencil and stenciled the stars on the cardstock using the English Lace paint.
CTMH "Blue Ribbon" sticker pack for the accents and such.
Blue and red cardstock.
Printed cardstock.
Here it is...


Thanks for visiting my blog!!!! :)
Nadya
Wednesday, November 11, 2009
White core cardstock week at Practical Scrappers!!!
Practical Scrappers is a blog that challenges you to use up your stash of supplies. Every week there is a new challenge. Every day new projects are posted that are done by the awesome Design Team. PS also has a message board with a gallery for layouts and cards, a forum to share all kinds of tutorials and so much more. If you haven't gone to Practical Scrappers yet don't wait. If you are in the scrapbooking block and need inspiration Practical Scrappers is just for you!!!!
This week we got to do some really fun projects with white core cardstock or magic paper. Just wait till tomorrow altered projects are going to be posted... :) If you haven't had a chance to work with this type of paper you got to get some and play. It is so much FUN!
For this week I had 3 projects done. I did one card, a layout and I had one card done back in September that I was saving for this challenge.


I used Hello Kitty sizzix embossing folder for all three projects.
Cheap board ABC letters and shapes for the layout.
Ribbon
Rob-ones
Jewels
Stickles
All kinds of papers...
Thanks for looking and don't forget to visit Practical Scrappers blog for more awesome ideas!!!
Blessings,
Nadya
Blog Blessing aka RAK!!!!
Jewels at Joy~in~Jesus is sharing a Blessing with all of us!!!
She is giving away an awesome gift... Go to her blog for more details!!!!!!

Blessings!!!
Nadya :)
She is giving away an awesome gift... Go to her blog for more details!!!!!!
Blessings!!!
Nadya :)
Thursday, November 5, 2009
Altered Burger King cup holder and 4 Starbucks coffee bottles.
Thursday is an Altered projects day at Practical Scrappers. So go to their blog and check out all the FUN altered projects they have up right now. So much talent. :)
Before I go on unto today's project. Don't forget that the Tri-Challenge at PS is going on right now as well. You have till TOMORROW to enter in too the challenge to win a prize. Check out all three blogs that are involved in the challenge. Practical Scrappers, Frosted Designs and StuckOnUSketches.
Today I wanted to share with you a very FUN project that I did for PS this week.
I'm so excited about it. This project is also for our Craft Silent Auction at our School that I'm hosting for our Church Building Fundraiser in December.
This would also be such a FUN gift to give to some one for Christmas. Yes, I said Christmas!!! Did you all know that Christmas is NEXT MONTH!!!! This year has gone by so fast!!! I'm thinking that a lot of our gifts this year are going to be handmade. At list that is something that I would like to do.
Couple of month ago we took the girls to Burger King through a drive through. With our drinks we got the cup holder. Our BK is 3 min away from our home so we went home to eat our food. I looked at that cup holder and the firs things that came to my mind were the Starbucks bottles that I have been collecting for altering. The once that I had were the tall once so they would be perfect for this cup holder.
So last week I finally decided to do the project. It was so MUCH fun. I got to use fun papers, paint, die cuts that have been sitting in my folders for what seems like forever now. And some fun and new tricks. I really had so much FUN doing this.
First to start this project you need Burger King cup holder or I guess any other cup holder or what ever else works for you. Acrylic paint, what ever color you want to use on your project, 4 Starbucks bottles.
Here is what my cup holder looked like when I started painting it. I only painted where the paper was not going to go on. I did 3 cots of paint to cover up the "Have it your way" words. The paint also made the card board some what stronger.

This is what the box and the bottles look like after I was done with everything, all 4 sides. Isn't this FUN???


Used:
Ginger bread man die cuts by Creative Memories.
Lollipop die cut from Cricut "Paper Dolls Dress Up" cartridge.
Snowflake stickers "Holiday Time" from WalMart.
White stamped snowflakes is a stamp from Martha Steward Christmas stamp set. Love the snow flakes in this set.
Stayz On white ink.
White gel pen.
Red acrylic paint.
3 different Christmas or just red ribbon.
Holiday sentiment stamp that I got at a garage sale, not sure what company it's from doesn't say on the block.
Cricut Accent Essentials cricut cartridge for the shape of the tag.
Gold Christmas jingle bells (I think that's what they are cold) that I picked up at WalMart.
Homemade Flower Soft, white. LOVE LOVE this stuff!!! :)
White card stock.
"Marrymint Candy Shoppe" Christmas paper by American Crafts. This paper is so beautiful!!!
SU scalloped punch.
Blue chalk for the edges.
Here are some up close pictures.... :)
Bottles next to the box. I also painted the lids on the bottles in red same as the box.


Here is what the tops of the lids look like.

Up close of the Homemade Flower Soft. I love Flower Soft, but have only one color right now. On Practical Scrappers board some one posted that you can make your own Flower Soft. I was so so excited to find that out. Here is a link with pictures and a video of how to do this Handmade Flower Soft. I'm totally addicted right now and this saves so much money for me... LOL :) It was so easy to make and was so much fun to play with. My girls thought it was real snow when I was done with the project.... hee hee :)


If you got any questions about this project let me know by leaving me a comment bellow.... :)
Thanks so much for visiting my blog today and I hope that you liked this project and it gave you some inspiration for your own handmade gifts this Holiday Season.
Blessings!!!
Nadya :)
Monday, November 2, 2009
Owls, ribbon, sketches and MORE!!!!
WOW! What a FUN week at Practical Scrappers this week.
They are teaming up with Frosted Designs and StuckOnUSketches this week for a Tri-Challenge.
Each blog has a challenge to do and all 3 are giving away a prize!!!! How cool is that?
Go to their blogs and check out all the challenges and the prizes that they are giving away!!!!
I had a lot of fun working on 4 projects for this Tri-Challenge week.
I did one project for each blog and the last one I combined all there together.
Here are my projects.
For Practical Scrapers I did a Christmas Card.


Used:
Paper from LSS.
Reindeer cut from Animal Kingdom cricut cartridge.
Red flower circle from Accent Essentials cricut cartridge.
CTMH Playful Flourishes stamp set.
Martha Steward snowflake stamp from the Christmas stamp set.
Stickles, red and star dust.
Home made white "Flower Soft" LOVE this stuff!!!! :)
3 different ribbons.
For Frosted Designs we had to use an "Owl" on our project. So I came up with this card.

Used:
Owl and "Whooo" came from Animal Kingdom cricut cartridge.
Strip paper from My Mind's Eye "Out and About" collection.
Other papers from LSS.
Brads and metal corners.
Some brown chalk.
For StuckOnUSketches we had to use a sketch that they posted on their blog. So here is my layout... Another page for my friends album. To see the sketch please visit StuckOnUSketches....

Used:
LSS papers.
Die cut flower shapes that I had for some time now.
Large brads.
Some Bo Bunny rub-ons that I had for some time as well.
CTMH Playful Flourishes stamp set.
Stickles around the brads and in the center of a flower.
Sticker strips that I had. Some from SU I think.
Spiral journaling book by Making Memories for journaling box.
Accent Essentials cricut cartridge.
"Easter" layout, with all three challenges. I turned the sketch around for this one.

Used:
CM papers. Sorry I don't remember what pack they are from. And I'm not even sure if CM has them any more.
Canvas ABC stickers by Making Memories from Just Chillin collection.
Spiral journaling book by Making Memories for journaling box.
Some Easter stickers.
Chalk.
3 different ribbons.
Thanks for visiting my blog today!!! :) Hope you liked my projects and don't forget to leave a comment and go visit the three blogs!!!!
Blessings!
Nadya :)
Wednesday, October 28, 2009
Another week at Pracitcal Scrappers!!! Woohoo!!!
WOW! What a week at Practical Scrappers!!! So much creativity!!!
OK, so the challenge this week was to use any kind of FUN punches. Couple of weeks ago we did the basic shape punches and this time around we got to use FUN shaped punches.
Here are the three projects that I did.
For the first card I used Creative Memories Galaxy Micro Maker, the little green one. I have done this idea before but never on a card... I think.... Anyways, I punched out bunch of these little shapes and adhered them on too a thing frame circle. I also used Creative Memories star maker both sizes for the star on top.
Gold for the star by CM.
Red cartstock from LSS.
Christmas stamps by Martha Steward.
Lots of stickles...
and here is the card....

The second card I used shapes from Accent Essentials cricut cartridge. The sentiment came from Lyrical Letters cartridge.

The third project was a layout. I'm continuing to work on my friends album so I did another page for that album. Again I used the same cartridges just different shapes for this layout.
Some ribbon.
Large brad.
Thikers ABC stickers for the title.
Paper form LSS.

Don't forget to check out Practical Scrappers for more great ideas and challenges!!!
Thanks for visiting my blog today!!!
Have a wonderful day!!!!
Blessings!
Nadya
Subscribe to:
Posts (Atom)