Showing posts with label stamping. Show all posts

Friday, October 9, 2009

"giving thanks for you"

I got a chance to do some cards for our SOS ministry at our Church. It stends for "Serving Our Servicemen". We are sending Thanksgiving packages to our military men that are deployed right now and I was asked to make some Thanksgiving cards. I saw this stamp "giving thanks for you" at our local scrapbook store and I just had to get it. I thought it was perfect for these cards. The leaves are by Making Memories I think, got them at Target. Used lots of fall colors, ribbon and some raffia.


Thanks for visiting my blog today! Hope you'll like these cards and get inspired to send something to our Servicemen this Holiday season.

Nadya :)

Monday, August 24, 2009

Couple of Boy Birthday cards...

Just some cards I did. I have three girls so I don't get to play or do a lot of blue cards or layouts. I got a new stamp set couple of weeks ago at Target and made these cards.... Stamps set is called "Sweet pea" by Fiskars.


Thanks for looking!!! :)

Nadya

Tuesday, August 11, 2009

CPCM-CM17 Color Mondayon on Christian Paper Crafts

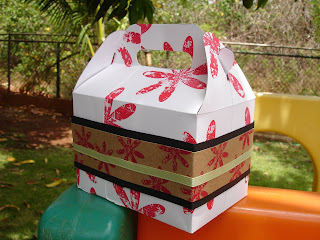
I finally got my project done for the Color Monday challenge on Christian Paper Crafts. We had to use kraft, red, and black colors and could create what ever we wanted. So I did this cute little gift box.

I'm starting on making some things for our Craft Silent auction that is going to happen some time before Christmas at our School. All the proceeds will go towards our Church building fund!!! We had a lot of fund doing the auction last school year and I'm looking forward to what the Lord will bring for us this time around!!!!

I got the box template from the Papercraft Inspirations web site. They have a lot of FREE templates there!!!! :)

Used:
White, black and draft cardstock.
Real Red SU ink pad.
CTMH "Rustic Flowers" stamp set.
A sentiment stamp that I had.
Ribbon, button, bling, stickles.

The front of the box.


The back of it... This is my first one so it has some improvement to do.... :)


And here I'm holding the box so you can see what size it is.


Not sure what I'm going to fill it with yet. Got any ideas??? :) I'm thinking some hand made cards or something like that.

Thanks for looking!!!!
Nadya

Saturday, August 8, 2009

Ask and He shall answer...

I've wanted to use my craftiness for the Lord in some way. I prayed that the Lord would show me a way to use the gift that He has so graciously given to me. The gift of paper craftiness I call it... :) I believe that I paper craft for a reason and I have been asking God to show me that reason, to show me the path that He wants me to take. What He wants me to do with this gift?

I have been doing some things for our Church, friends and family. I love that part. I love to be able to do something for the Lord from the heart. To see people smile and get so excited!!!! Brings JOY to my heart!!! I've been blessed abundantly. I have a husband that encourages me in my hobby, Church, friends and family that encourage me and lift me up when needed!!!

The last couple of week I've been really praying that God would help me use this hobby more for Him. And just couple of days ago I believe that He has answered my prayer and I am so excited!!!

You see my daddy has a Russian Christian Book store in Portland, Oregon. He has just moved his location and is doing some major work in his new store. So, the Lord send me a thought of making cards for my dad's store. How cool would that be? So I went on a hunt for some Russian stamps, but didn't find any with Bible Scriptures. So the next best thing would be to print them. And so I did. I am so excited! I've been working for the last couple of days making cards for him and did well over 20 different types of cards now. But the part that is exciting the most to me is that I got couple of cards with Bible Scriptures in Russian and I just know that mom and dad are going to be so thrilled!!!!

So here we go...

The first card the Bible verse is "Watch ye, stand fast in the faith, quit you like men, be strong." 1-Corinthians 16:13


Second card is "Behold, God is my salvation; I will trust, and not be afraid: for the Lord Jehovah is my strength and my song; he also is become my salvation." Isaiah 12:2


I took this pic last night in the house it was dark already sorry.
Bible verse is "A new commandment I give unto you, That ye love one another; as I have loved you, that ye also love one another." John 13:34


Thank you for reading this post and for being part of my hobby! I hope that you have found some inspiration in this post. I can't wait to get these cards to my dad!!! :)

Nadya

Tuesday, August 4, 2009

Flower Soft and Practical Scrappers Challenge!

I posted yesterday that I got my first tin of Flower Soft and BOY do I LOVE IT!!!!? :) It's is so AWESOME!!!

I found these two videos that are very very helpful. The lady has a very nice teaching voice and she explains everything so nicely!!!!

Flower Soft video #1
Flower Soft video #2

Make sure you watch both of them if you want to learn more about Flower Soft and awesome ways to use it!!!! I'm just starting out with it so both of these videos have been so helpful to me.

I had a BLAST working with Flower Soft last night. My husband and my brother in law who is visiting us right now even liked the cards that I did.. LOL :) It was SO easy to use and so much FUN!!! Now I need to get more colors!!!! hee hee

So here are the cards that I did plus a layout using Flower Soft. It is so windy outside today that I could not get the layout and cards to stay still. I take my pictures outside for better lighting. So I'm sorry if the pictures didn't turn out all that great.


Used on both of the cards:
Flower Soft Heather.
Aleene's tacky glue.
Flowers stamp from Garden bouquet collection by Posh Impressions.
CTMH Ink pens, Hydrangea, Topiary and Holiday Red.
Scraps of CM embossed paper that I had left over.
Bazzill Olive green card stock.
White card stock.
Star dust stickles.
Eyelets by SU.
Rub-ons.


They layout is simple. Some paper STMH stamps and Flower Soft. I just had so much fun playing last night!!! :) The layout is also a Challenge page for Practical Scrappers. We had to use 5 eyelets on a layout. Go check out their blog and what their DT team came up with for this challenge.

Here is my layout. The 4 eyelets are on the two pink strips at the bottom and the 5th one is on a circle. For the title I used Lyrical Letters cartridge the Capital font.


Close up of the circle that has the flowers with Flower Soft.


Thanks for looking and I hope you liked my projects!!!

Nadya :)

Saturday, August 1, 2009

Lita's sketch #4 and Scrunchy Flowers...

I have two projects to show you today!!!!

First is the Scrunchy Flower or paper flower or the flower that everyone is making these days. :) I've seen them EVERYWHERE! There's a lot of great tutorials out there for these flowers. I found this tutorial at Christian Paper Crafts to be very easy and simply to follow.

I finally took the time last night to make couple of these flowers as I was waiting for my husband to finish up his home work. If you haven't done these yet, you have too. They are so easy to make and are so CUTE!!!

Here is a card that I made for a boy birthday for a friend with the first flower that I did.


Up close of the flower.


Second is Lita's #4 sketch. To see her sketches please visit her blog at Embracing Imperfection.

I had a lot of fun doing this sketch. I just love how these little scrunchy paper flowers turned out!!!! I started working on the Volume 2 album for our friends and the photos are of their oldest daughter. She is such a good kid!!!!


And the corners with the flowers.


I just LOVE how these flowers turned out!!! I see my self making more of these that's for sure!!!

Thanks for looking!!!!
Nadya

Sunday, July 12, 2009

My take on Lita's first Sketch....

***Don't forget you can click on the pictures to make them bigger!!! ***

I was at a friends house yesterday till about 1 am, I think... all I remember is that it was pass midnight when I was starting to pack up... The kids were tired they fall asleep right away in the car on our drive home.


But we had a lot of fun at Mrs. Ivy's house... :) She was scrapbooking away. I think she did about 2 or 3 (maybe more) two page spreads. While I forgot the projects that I was going to work on at home. But lucky me I grabbed some single photos off the table right before I left the house. So I decided to use those photos and do Lita's sketch sense I was planing on doing that anyways.

So here is my take on it. I did 2 layouts using Lita's sketch #1. You can find it here.

The first layout is of me and our oldest daughter when she was one year old.


I stamped the white accent peace with some swirl stamps all the way around.


Used:
Accent Essentials cartridge for the main accent on the page. Size 8 1/2 I think and then the shadow.
Plantin SchoolBook for the title. Size 1 inch.

Flowers.

Brads.

Chipboard shapes.

Tearing tool from CM.
Swirl clear stamp set by Autumn Leaves.

Scraps of Scrapbook paper that Ivy had... Thanks Ivy for letting me go through your scraps... :)

The second layout is of my dear niece and nephew. I miss these munchkins... :)


I raised the tops of the mushrooms by stamping another mushroom with another color and just cutting out the top part and then used some of the foam tape to raise them up. I LOVE the mushrooms, I so need to get that stamp set.


Used:
Mini Monograms cartridge the scalloped circle.
Plantin SchoolBook cartridge for title, size 2 1/2 inches.

Pooh and Friends cartridge for the tree size 3 /12 inch tall.
CTMH Whooo Loves You! Stamp set
CTMH Nature Walk stamp set.
CTMH varies ink pads.

Colored pencils.
Ribbon.

Ivy's scraps of papers.

Thanks for looking and I hope you liked my take on this sketch. Be sure to come back to Lita's blog for another sketch on July 25th. Can't wait to see that one!!!!

Nadya :)

Friday, July 10, 2009

Card: "Baby Shower"

A dear friend of mine is having a baby in August. She is due with their third baby girl. She had asked me if I could do some cards for her for her baby shower. So I thought it would be a perfect gift to go through the mail. Seance she lives in North Carolina and I'm in Hawaii.... :)

So here is what I came up with!!! Lyuba I hope you'll like the cards. Wish we lived closer so I could attend your Baby Shower!!! May the Lord Bless you and your new baby girl!!! :) 3 girls are a lot of FUN!!!!!

I stamped the flowers on too the white card first then stamped the pink paper with a silver/brown pigment ink pad. The pink paper is embossed with some dots, got it like that from the craft store.


I didn't have enough of the pink paper so I used the left overs. But I still like the way it came out. This is what the card looks like with the smaller peace.


Used:
CTMH Rustic Flower stamp set.
Amercian Crafts "Baby" stamp set
CTMH Bubblegum and Garnet ink pads.
SU Classic Black ink pad
Pick pigment ink pad
Silver/Brown pigment ink pad

*Ribbon
*Flowers
*Brads


Thanks for looking and I hope you liked the cards!!!! :)
Photobucket

Wednesday, July 8, 2009

10 "Thanks" cards....

While my sister was here I got to do some cards for her to use for her new business. I'll have to tell you all about her business one day. :)

My friend Ivy let me borrow two of her cricut cartridges "Mini Monograms" and "Pooh and Friends". I have to tell you that these cartridges are absolutely awesome. They have so many fun things on them. I just love them and they are on my list to get that's for sure... :)

So anyways here are the cards. They are simple not too elaborate cards. One day when I grow up I'll learn how to stamp and color stamped images the right way.


Used:
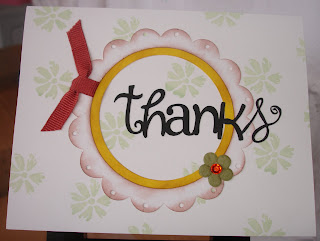
For these cards I used the "Mini Monograms" cart. I cut out scalloped circles and squares in all different sizes and the "Thanks" word was cut out in 1 inch size.

Flower stamps that I have.

Jewels, ribbon, some brown chalk and just other things here and there.

Photobucket

Tuesday, June 23, 2009

Cards, paper, cardholder box/purse......

This post is going to have a lot of pictures in it. So hopefully you'll stick around till the end and maybe get inspired in one way or another in your creative area. :)

I've been doing a lot of different projects this year. For the last 4 month I would say I have things going on, things that need to get done. And I love it. I love using my cricut. It's the best things I ever got. My husband is so awesome... :)

As I've mentioned in another post that I've been privileged to help out in a wedding. The last thing that I did for the bride were the name tags that I posted about a couple posts ago.

Today I wanted to show you what I did with the negative flower/swirl looking die cut from the name tags. You can fit 47 cuts (I believe) on the 12x12 sheet. The flower came from the Lyrical Letters cartridge. (I love this cartridge by the way.) After cutting out all those flowers out I looked at the left over 12x12 sheet of paper that had all of those flowers cut out from and I just couldn't throw it away. I thought there must be something that I could do with it. So here is what I did. I know this has been done before with so many other things. But still, I thought this was kind of cool and it just might give some one an idea that they haven't thought about yet.

I took that negative sheet put it on white card stock. Then took a sponge of any kind (anything will work really) dipped in to ink and then tabbed on the white that was showing through. You'll need to let the ink dry before using a different colors or you can just go and stamp right over while it's still wet and you'll get an image with multiple colors in it. Both look cool.


Here I used this cloth thing that gave me a streak like image on top of my flowers.


This is what my negative paper looks like now after using all kinds of colors on it. You can do so many things with just this one sheet. It really last you for a long time.


Take the negative paper that was used as your stencil carefully off of the white card stock and here is what you get. Beautiful print.


You can see the streaks here.


Here is what you get if you stamp right over the wet ink. Colors mix and kind of gives you a cool look.


I did 10 cards using the stenciled paper.


I added some stickles here on the stenciled flowers.


I also did a cardholder box/purse that holds up too 20 cards in it. Very easy to do. A friend of mine who is an SU demonstrator showed me this box. I used some CTMH stamps on top of the stenciled images just to add little extra. I also did a card that was left from that sheet of paper.


Don't know if you can see. But I did some dry embossing on this card. Trying new things.


Here is the whole bundle. I would like to give it to some one as a gift, just don't know who yet... :)


Thanks for looking and hope you liked my latest project!!! :)
Nadya